
How To Install Solar Panels
Thinking about switching to a cleaner and more affordable energy source for your home and you have the DIY skills and materials, you might be curious to learn how to install solar panels on roof supports.
Installing solar panels might seem a daunting task at first, but figuring out if it’s worth it isn’t too hard. The main thing is to see if you can get enough sunlight where you live to generate power regularly.
Solar power has some drawbacks, such as the environmental impact of making and disposing of panels. However, putting solar panels on your roof is a way greener option compared to covering vast areas of land. This way, you’re not harming large portions of the ground.
People install solar panels to ensure that their money is invested in the right place. The main question is how long does it take and when does this recovery begin. Because your home already takes up space, putting solar panels on your roof doesn’t harm natural habitats.
Plus, if you have the right tools, tips, and skills, installing solar panels can be quite straightforward.
What To Consider During Solar Panel Installation
Switching from local electricity production to solar panels is a bold step and it takes time to install them. Take your decisions prudently and wait patiently for the results. One doesn’t have to be in a hurry to have good results from solar installations.
Solar panels installation is a long process that needs expertise and patience because it is not just bringing the panels and installing them. The whole process involves an analysis of the site, the feasibility of installation, and many other factors. How to install solar panels step by step is what is requisite in the whole procedure.
Solar panel installation is a big investment, and it needs you to think a lot and research the process. How to install solar panels, where to install solar panels, what should be the orientation, and when to make them operational, there is a myriad of questions like this. This is not a useless investment and like any other investment, you want to get the maximum profits out.
1. Site Assessment
The very first step in solar panel installation is site assessment. How long does it take to install solar panels? A seemingly easy answer is a few steps. But the very first of it, site assessment, takes about one to two weeks. Once you hire a company for the installation, their professionals will arrive on-site and have a look at the site for feasibility. Once it is assessed and approved, you will proceed to the next step which is local permitting. During the assessment, the company checks if your site is fine for solar panels installation and will it be of any use in your case.
Your roof and home construction will be checked to ensure that it is safe to install solar panels on your roof. Another thing they will determine would be how to install solar panels, i.e., their arrangement and orientation. The professionals will take measurements and confirm that there are no obstructions.
2. Permission Before Installing Solar Panels on Roof
It isn’t that easy, before doing that you have to seek permission from authorities for installations. Like any construction project, your local authorities will give you the right permissions for the installation of solar panels. Both govt. and homeowners’ authorities will look into the project and will give you permission to proceed with it.
The time varies based on the efficiency of these two authorities. The permits you will likely need are a general electric permit, a construction permit, and a photovoltaic permit. This takes about three to six weeks.
3. Solar System Design
An important step in the solar panel installation process is the design of the solar system. It depends upon the type of mountings and solar panels you will install. You have to contact your contractor and they will order the requisites if they don’t have them in stock. This step usually takes one to two weeks if there isn’t any undue delay.
If there is some equipment that comes from overseas, then you will have to wait for its arrival. Before the installation, the design will be checked for feasibility and then after approval, it will be installed. You can continue this step in tandem with the previous step and that will save you time.
4. The Installation
Which is the first step in building a solar system? The first tangible step can be called the installation where you see progress on the ground. It doesn’t take much time as the previous steps and can be completed in one or two days, depending on the size of the installation.
Most people ask solar installation companies: how do you install solar panels? The answer is simple. The professionals arrive at your house, unpack the equipment, and will start working on the installation. Usually, small projects of installation are completed in a day. In the case of relatively bigger projects, the time required is more, like a few days. Once this step is completed, there is less left to be worried about.
5. Inspection
An important step in the solar panel installation process is inspection. The local inspector arrives to check if the solar panels have been installed correctly. Before that, you can not make your system operational. Once you get permission after the inspection, you can begin to make use of the solar installation.
Though this seems irritating for the user, it is done to ensure their safety. It may take about one week.
6. Utility Connection
The final step is to file an application with a local utility company to make use of the energy produced. You can connect your system with theirs and they will determine the energy production with a meter to pay for your contribution.
How To Install Solar Panels on Roof Step-by-step?
Before going for questions like how to install solar panels, we must try to know what are the benefits of solar panels installation and how much they return back our investment. Once you decide on the installation of solar panels, you are eager to know about the whole process involved in the installation and later the reaping of the fruits of the toils.
1-Gather all the Necessary items.
Getting all your materials and tools ready is the initial key to a successful project and can save you a lot of time. Climbing up and down the roof to find missing items can be avoided with proper preparation.
Here’s what you’ll need:
- Solar panel
- Stanchions
- PV wire
- Mounting brackets
- Drill and drill bit
- Rails
- Tape measure
- Chalk line
- Screws
- Ladder
- Lags
2-Mark Location
Now, the next step is marking the spots on the roof where the stanchions will go. These marks are crucial because the strong metal structures support the panels and need to distribute their weight evenly across the rafters.
Refer to your house’s blueprint to connect the stanchions to the roof’s rafters. Also, make sure the stanchions are aligned (you can use the chalk line for this) before drilling and position them four feet apart from each other.
3-Fix Stanchions
Make sure to securely attach your stanchions as they will support the panels. Start by pre-drilling holes in the rafters and then fasten them with steel bolts. Double-check to ensure that each stanchion is at least four feet apart from the other.
4-Install Flashing
Next, secure the flashing beneath the shingles and fasten it with bolts onto the rafters. This process prevents leaks after poking holes and maintains the roof’s waterproofing.
The bolts also have sealants, protecting your roof against any potential leaks.
5-Affix the Rails
Start by screwing and securing the holes, then use bolts to attach the top and lower rails, preferably with an impact driver. Make sure to tighten them well to keep them securely in place.
Use your tape measure to measure the distance between them and ensure that the diagonal distance is equal. Checking diagonals is the quickest method to confirm they are square. If not, you’ll need to make adjustments or, if necessary, redo the drilling process.
6-Fix the Inverters
All the steps mentioned above were preparations for the installation process. The next steps involve wiring the solar panels, which requires careful handling and attention to detail.
- Firstly, it’s important to understand which wires you need and how to attach the inverters beneath each panel. Each micro-inverter should be connected with six-gauge copper wires going into and out of the arrays.
- Route these wires from the panels to a meter and then to a sub-panel. From there, run them to the inverters through the rails. Always remember to turn off the power before starting the wiring process.
- Having a diagram of the wiring plan and the placement of your panels can be incredibly helpful before you start the installation process.
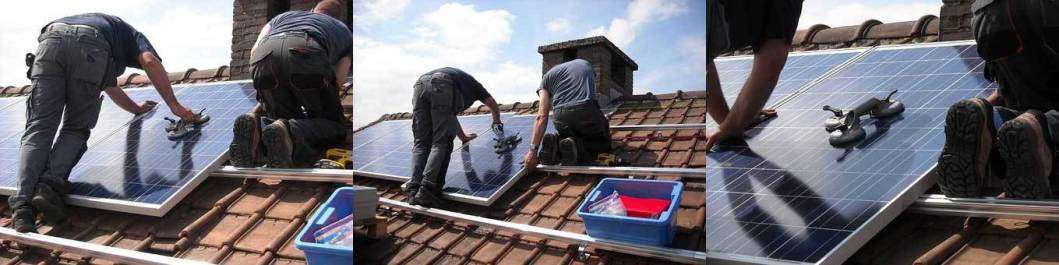
7-Solar Panel Placement
Once you’re certain that the wiring is correctly done and the connections are functioning, the next step is to attach the panels to the stanchions you drilled earlier.
Start by attaching the brackets to the panels, which you can do before climbing onto the roof. Lift the panels and ensure they align with the rails you previously set up. Secure each panel to the rails using bolts and clamps. Finally, thread the wires through the panels and the inverters to complete the circuit.
8-Connect the Inverter
The final step is to power up your panels by connecting them to the solar inverter and electric meters. Before you start, make sure to turn off the power in your house. Connect the inverter to the electric panel.
If your inverter is placed outside, it’s important to keep it shaded. Connect the battery and fuse board/consumer unit. This setup is crucial because the inverters convert DC power from the sun into AC power that you can use at home.
You can skip the battery, but it’s essential for boosting your power on cloudy days.
For this connection, hiring an electrician to ensure no fire hazards is a good idea.
Many counties and cities require professional technicians like Solar Earth INC to perform this process, so check your local building laws before proceeding.
How To Install Solar Panel on Roof Based on the Different Roof Types
The roof type also impacts the solar panel installation process on the roofs. Roofs come in different materials and shapes, each affecting the installation method. It’s important to choose panels that are compatible with your roof type, ensuring ease of use and energy efficiency.
Metal Roof:
Metal roofs are among the easiest to work with, as their structure allows you to mount solar panels directly. There’s no need for complicated calculations or alignments before installation. You can securely attach the panels using U-clamps, eliminating the need to drill holes into the roof.
Tile Roof:
Tile roofs are more complex, and there are a few methods to attach solar panels. One option is to use a special rack as a frame. Alternatively, you can remove some tiles and insert metal shingles in their place, which are easier to drill. Spanish roofs can be trickier, as some tiles might get damaged during installation, requiring replacements afterward.
Flat Roof:
Flat roofs offer flexibility for customization and adjustments. You can position the panels to face the best direction and use mounts to angle them towards the sun. This is unlike sloping roofs, where you have to choose one side, making adjustments challenging. The advantage of flat roofs is that you don’t need to drill holes to secure the panels; instead, you can use cinder blocks or ballasted racking.
Steps for Homeowners Who Do it Themselves
Once they are done with the whole process, they can work on the last step mentioned above. On the other hand you must know about photovoltaic vs solar panels differnce and what to choose. If you don’t want to connect to the local system, you can determine the usage of energy before and after installation and look into your savings.
You should estimate the total costs and then check how much your solar panels are paying back on a monthly or bimonthly basis. Benefits and costs should be compared which will show how much you have saved.
What Should I Do if I Don’t Know How To Install Solar Panels on Roof?
Many residential buildings have roofs well-suited for solar panel installation on the southern slope. However, for homes with steep pitches, the installation process can be challenging.
If you’re unsure about how to install solar panels on a steep roof, it’s wise to consider hiring a specialized professional installation company.
Alternatively, you can choose to mount the panels on the ground using a frame placed in a well-lit area near your house. However, ground setups need consistent maintenance, and more inflexible rules and regulations might exist.